Friday, September 10, 2010
Free Rapidshare Premium Account
Free Rapidshare Premium Account
If you’ve been looking for free Rapidshare Premium Accounts for the past decade and finally realized : all the logins and passwords are fake! No problem by itself but you still want that free Rapidshare Premium Account. So that leaves you with 2 options : You can either BUY it ($10/month – is it really worth it? Of course …)or
EARN it (a few minutes of your time)
Obviously, if you chose the second option you don’t want to spend any money on that Rapidshare account. No one does. Here I’ll tell you how to EARN a Rapidshare premium account. All you need is a PayPal or AlertPay account. Its free and as easy as creating an email account. Next, you’ll have to visit a few paying sites, register and click a few ads in them. Anyone who can use a computer and spare ten minutes can do this. I have given a list of these paying sites below. At the end of this, you’ll be having enough balance in your account to buy your own Rapidshare Premium! And even better, you can use this balance to buy products on eBay, shop online, buy software or just withdraw it. Just follow these steps:
1. Create a PayPal account  and an AlertPay account
  (both are free and will help you collect the money you earn from the websites below)
2.Visit the following paying sites and register:- Plebs Cash – Earn cash!
- CashCrate
- Valued Opinions ($5 – $50 a Survey)
- Advercash
- PaidClicks
- TheClickers
- Clicksia
- TitanClicks
- Subvert and Profit (You also need a Digg or StumbleUpon account for this one)
4.Receive money into your PayPal and AlertPay accounts.
5.Use this balance to purchase a Rapidshare Premium Account.
That’s it. You’ll have your own premium account in no time. And stop searching for stuff like free Rapidshare passwords, hacks, links, tricks etc. It does not work and by doing so, you are encouraging spam.Good luck!
Complete Rapidshare Hacks, Tips & Software
Complete Rapidshare Hacks, Tips & Software
RapidShare is a popular free unlimited file hostingservice.

I have tested some rapidshare software (downloader & uploader) and there are free for download.
List of rapidshare software that worked
- Rapidown, I have tried this rapidshare software. This software is Great! You can download multiple software at the same time, download files with unlimited connection, pause the download, download files without time limit & unlimited download in rapidshare server! But, this software isn’t use english languange, i’m little confuse. The overall of this software is excellent.

Download Rapidown
Password for all archives : www.zepy.net - USDownloader V5, This rapidshare software is the newer version of USdownloader, you can select the rapidshare server to download file. This software has been tested by me.

This file include openssl, you must install this to get usdownloader working.
Download USDownloader V5 by nemesis63
Password for all archives : www.zepy.net - Universal Link Checker, Application checks for avaliblity of files shared on various servers. Application requires .Net Framework v2.0
Supported servers:
Rapidshare.com
Rapidshare.de
Filesend.net
Megaupload.com
FileHO.com
FileFactory.com
Megashares.com
Nahraj.cz
eDisk.cz
FileHosting.cc
F-Forge.com
FilesUpload.com
Badongo .com/.net
Download Universal Link CheckerPassword for all archives : www.zepy.net - Rapidsearch, Rapidshare Software to search files in the rapidshare server

Download RapidSearch
Password for all archives : www.zepy.net - Megaupload Link GRabber, This software for megaupload, share.am & Megarotic

Download Megaupload Link GRabber
List of Rapidshare Search Engine
Users usually need rapidshare search engine to search files in the rapidshare, so i made some rapidshare search engine list- Rapidfox, General Rapidshare Search Engine
- Rapidsearch.org, You can search album, single song track & video in the rapidshare server via rapidsearch.org
- RapidshareFiles, I think this is a complete search engine to search files. You can search files in megaupload, rapidshare, uploading & many more. This site is powered some popular search engine like google, yahoo, msn & altavista.
- Search Upload Server, The toolbar to search over 45 free file hosting.
megaupload.com
mihd.net
mooload.com
mytempdir.com
oxyshare.com
rapidshare.com
rapidshare.de
many more….
This toolbar is fully compatible with IE & Firefox, but i haven’t tried it yet.

Rapidshare Hacks, Tips & Tricks
Search for files related with dvd
You can use google search engine to search files in the rapidshare server, use one of this methods:site:rapidshare.com dvd
+inurl:dvd site:rapidshare.com
Note: inurl will search for the URLs that contains the specified keywords only
To search for multiple file format, such as dvd and mp3:
site:rapidshare.com mp3 OR mp3 OR dvd
+inurl:mp3|dvd site:rapidshare.com
Some Another Examples:
To search all video files available on rapidshare…
google: +inurl:avi|mpg|wmv site:rapidshare.com
To search all archives and programs available…
google: +inurl:exe|rar|zip site:rapidshare.com
To search all music files available…
google: +inurl:wma|mp3|ogg site:rapidshare.com
Solve “Download session invalid”
“Download-session invalid. Please click here”The reason:
Download-session expired. Direct-links last a few minutes for free users and a few days for premium-users.
You requested this download-session from a different IP than yours. If you use AOL, try a different browser.
If nothing helps, getting a premium-account will override the IP-check, which means it will solve this problem.
Trick:
Before you click “FREE” button, shut down your modem and then restart it again.
Rapidshare Protection Links & Anonymizer (Proxy)
Some sites that offer rapidshare protection linksTuesday, September 7, 2010
CheatBook-DataBase 2010 1.0

Publisher’s Description of CheatBook-DataBase 2010 1.0
CheatBook-DataBase 2010 is a freeware "cheat-code tracker" that makes hints and cheats (for PC, Walkthroughs, Playstation, Playstation 2, Playstation 3, Sega, Nintendo 64, Nintendo DS, DVD, Gameboy Advance, Gameboy Color, N-Gage, Nintendo DS, Xbox, XBox 360, iPhone, Gamecube, Dreamcast, Super Nintendo, Wii, Sony PSP) easily accessible from one central location.If you're an avid gamer and want a few extra weapons or lives to survive until the next level, this freeware cheat database can come to the rescue. Covering more than 19.000 Games , this database represents all genres and focuses on recent releases.
Games are listed alphabetically in the left-hand window. When you click on a game name, the relevant cheat is displayed in a editor window, with convenient buttons that let you print the selection or save any changes you've made. In the latest past many users of the CheatBook- DataBase and readers of the monthly being published magazine have sent to us small error messages and suggestions for improvement again and again.
Many of the suggestions which we received are now realized in the new version 2010.
- comfortable adding of individual cheats
- cheats can be edited more easily now
- separate section with solutions
- files and images can be stored
- simple survey of informations about the cheat
- statistics
- comfortable filter conditions
- consoles cheats added
- 18 different consoles now possible
- search machine was revised
- link manager
- history log
- News and Updates
- private user data base
- Import old Own Bases
- Skins
The program is small and setup is a snap. Once CheatBook-Database is on your hard drive, use it as much as you want because it's free.
Release date January 4. 2010 CheatBook-DataBase 2010 is Freeware for Win95/98/2000/NT/XP/Vista.
All Cheats inside from first CHEATBOOK Jan.98 until toda
Tuesday, May 25, 2010
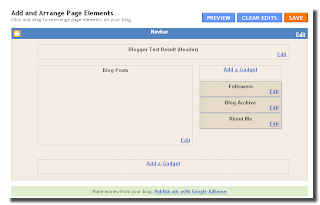
Add The "Add a Gadget" on Header and Blog Posts of Blogger Page Elements
As well as another Content Management System (CMS) base sites (ie : Wordpress, Joomla, Mambo, Drupal etc) Blogger Template consist of Page Elements (header, main, sidebar and footer) and Each element of this page, usually also composed of a few gadgets (the name may be different on each CMS).
Pege Elements are very important. In addition to its function, Elements (Widget) of the page and Gadgets, also affect to the overall look of the pages of our blog.
One of the advantages of a CMS base sites is the Flexibility, In these CMS sites, we could cange the Elements, add or less the Gadgets and also set the appereance (display) of the Page..
Let's do it by following this steps:
1 . As usually Log in to Blogger
2. On your Dashboard, select the Layout menu, than click the Edit HTML. Under the Edit Template you can see your Blog's HTML. (please Back up first...!)
3. To have an “Add a Gadget” option, under “Header”, Check the "Expand Widgets Templates" then Scroll down and towards the bottom, you will see these lines (use Ctrl+F to find):
Change with this :<div id='header-wrapper'>
<b:section class='header' id='header' maxwidgets='1' showaddelement='no'>
<b:widget id='Header1' locked='true' title='Blogger Test Result (Header)' type='Header'>
<b:includable id='main'>
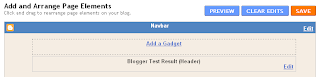
This will give you 1 more Page Element in your Header. You can add it more by change the number of maxwidgets="..."<div id='header-wrapper'>
<b:section class='header' id='header' maxwidgets='2' showaddelement='yes'>
<b:widget id='Header1' locked='true' title='Blogger Test Result (Header)' type='Header'>
<b:includable id='main'>
Than change with this:<div id='main-wrapper'>
<b:section class='main' id='main' showaddelement='no'>
<b:widget id='Blog1' locked='true' title='Blog Posts' type='Blog'>
<b:includable id='main' var='top'>
Once You have done, don't forget to Save Template... And You will have :<div id='main-wrapper'>
<b:section class='main' id='main' showaddelement='yes'>
<b:widget id='Blog1' locked='true' title='Blog Posts' type='Blog'>
<b:includable id='main' var='top'>
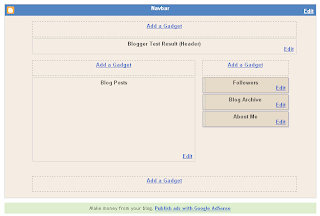
Finnaly we have a "New" Blogger Page Element ready to optimized...
How To Make a Sticky Post in Your Blogger With a Simple Trick.
Because of the specific goals, sometimes we want every guest who visited our blog, read or see: pictures, messages, or a particular post on all of our blog pages they were visited, it's call a sticky post.
Usually we put the sticky post above the blog post.
In blogger post rule, a new post will be shown on the top, while the older one place below/after it or become archive (depending on your post setting), but with this very simple trick you can remain your post sticky at the top.
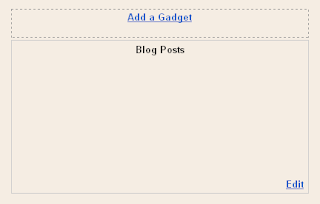
Actually this trick is very simple, The key is add the "Add a Gadget" widget above Blog Post in Page Element

The rest step is just to add our Sticky Post (or you can put picture, message, HTML/JavaScript ) by Add a Gadget Widget above the blog post.
If you want to add a "post form" exactly like your post, then you can add a "Text" gadget.
Please not to write your post title in Title Column because it will show up as a "Gadget Title" not as a Post Title, you better write it in Content. and set the display as a Post Title.

The Problem is: to do this trick, we must use HTML code to make up the text... But don't worry, if you are not capable with HTML Codes, there are simple and fast way to make your sticky post without learn it. Use your "New Post" to make a sample of your sticky post, set the display as close as your real post, use the Preview to check your sticky post display then copy-paste into your content collumn text add gadget.
Open your Blogger Dashboard >> New Post. Write your sticky post.

Use Preview to check your final displal, Block your Sticky Post text.

Open your Dashboard in a new Tab >> Layout >> Page Element >> Add a Gadget (above your blogpost) >> Click Text >> Paste your Sticky Post into content column. and Save it.


How To Make A Sticky Post In Blogger
Sticky posts in blogger blogs are like featured posts in wordpress. By default your blog homepage shows recently published posts but you can keep a certain post as your sticky post and which will stay above all other blog posts. This is great to highlight your best or an important post. This sticky post will be there above all posts no matter how many new posts you publish. All your new posts will get arranged below that sticky post automatically.
<b:section class='main' id='main' showaddelement='no'>.
This code is for the post section. We can edit this code to add another gadget on our post body.
4. You have to change NO to Yes in the above code. That means after editing the code it should look like
<b:section class='main' id='main' showaddelement='yes'>
Save the template.
Read more "How To Make A Sticky Post In Blogger"

Earlier bloggers used to publish a post on a future date to activate this sticky post on their blogger blogs. For an example if you schedule a post to get published on 13-12-2009, this post will be there as the sticky till 13th december 2009. Blogger was not supporting scheduled posts and as a result that post would be there till that scheduled date. But Blogger fixed this bug a while ago and this trick is not working anymore.
So, we have to follow any alternative method to make a post sticky post. Well, we can’t call this a sticky post exactly, because this will not be a post though it will stay above all your blog posts. This can be done with a simple HTML edit. You can also change that sticky contents frequently. You will be having total control over that. Lets discuss about it in details.
1. Navigate to Page Elements >> Edit Template
2. Search for the following code in your template
<div id='main-wrapper'>
<b:section class='main' id='main' showaddelement='no'>
<b:widget id='Blog1' locked='true' title='Blog Posts' type='Blog'/>
</b:section></div><b:section class='main' id='main' showaddelement='no'>.
This code is for the post section. We can edit this code to add another gadget on our post body.
4. You have to change NO to Yes in the above code. That means after editing the code it should look like
<b:section class='main' id='main' showaddelement='yes'>
Save the template.
5. Now navigate to Page Elements and you can notice a new Add a Gadget option there above your post contents. Check out the below screenshot.

6. You can use either TEXT or HTML/Javascript gadget to write your post and then save. This will show your text above all your blog posts.
7. You are done.
This is how you can make a sticky post on blogger blogs.
How To Install Themes in Google Chrome?
Google Chrome was released only yesterday and there are several tips and tricks already making the rounds including our own Ultimate list of tips and tricks for Google Chrome. The good thing about the Internet is that you can find interesting things quickly.
One such thing we came across was changing the default theme for Google Chrome, though this is not available as a option it can be easily done by following these steps. Google has its own Theme Free Chrome Themes website, but it is not live yet.

Create Separate Profiles in Google Chrome for Family Members and Stay Extra Safe
If you have started to love Google Chrome and have made it the default browser on your computer, here’s a useful tip regarding your privacy. The tip is more relevant for people who have computers in the living room and that same machine is shared among all other family members.

The address bar in Google Chrome is almost as dangerous as the awesome bar in Firefox.
Why You Need Separate Profiles in Google Chrome
Google Chrome makes it very easy for you to access your web search history including the search queries that you may have typed in the past. Now this may sometimes lead to an slightly embarrassing situation if someone else use your browser because all your past interactions are exposed the moment he or she begins to type in the address bar.
To prevent yourself from getting into this ‘not so comfortable’ situation, what you can do is create a separate user profile in Google Chrome. Thus all your browser history, bookmarks, cookies, search terms, etc. are not shared with anyone else in the family.
How to Create Profiles in Google Chrome Browser
Unlike Firefox that ships with a Profile Manager, the only way to create multiple profiles in Google Chrome browser is manually. Here’s how:
Step 1: Load Chrome and choose "Clear Browsing History" from the Tools menu. This will clear all your private data.
Step 2. Open your Google Chrome installation folder that is available at:
For Windows Vista - C:\Users\\AppData\Local\Google\Chrome
For Windows XP - C:\Documents and Settings\\Local
                    Settings\Application Data\Google\Chrome
 Step 3: Open Windows Explorer and switch to the "User Data" folder available inside Chrome installation folder.
Then select the subfolder caleld "default" and make a copy of it in the "User Data" folder itself. Give that copy a name, say, Your_Name. (See screenshot).
Step 4 (Optional): We will now initialize this new "Your_Name" profile to the factory default settings.
Open "Command Prompt", switch to the Chrome Application folder and run the following command:
chrome.exe --user-data-dir="..\User Data\Your_Name" -first-run
Step 5: So our new user profile is ready. To run Google Chrome using this profile instead of the default profile, just create a shortcut on your desktop, Quick launch bar or your Windows Start Menu.
Right click anywhere on the desktop, choose New -> Shortcut and type the following for location:
For Windows Vista: C:\Users\Aryaman\AppData\Local\Google\Chrome\Application\chrome.exe –user-data-dir="..\User Data\Your_Name"
For Windows XP: C:\Documents and Settings\User\Local Settings\Application Data\Google\Chrome\Application\chrome.exe –user-data-dir="..\User Data\Your_Name"
 Give this shortcut a "hard to guess" name, change the icon to use that of, say, Microsoft Word and you’re done.
Now none of your visits to those "adult sites" would be known to anyone else in the family. And no need for you switch to that incognito browsing mode.
Run Google Chrome in Ubuntu with WINE
Run Google Chrome in Ubuntu with WINE
 One helpful
 Google Chrome Browser Shortcuts List
Google Chrome Buzz has almost bitten me and i can’t stop myself from posting Google Chrome Related Stuff. Many news are floating arond BlogoSphere with some of them are very interesting like Seven hidden pages of google Chrome Browser.
Mean while experimenting with Google Chrome I just got stuck at finding Google Chrome shortcuts list, which seems to be not available any where. I can’t live without Shortcuts, so I myself started finding Google Chrome Shortcuts.
It took me around one hour to get some useful shortcuts list which I am posting here,
Google Chrome Browser Shortcut List
1) F3 & CTRL+F Search on Page

2) F5 Reload
3) CTRL+D bookmark

4) CTRL+W close Google Chrome Window
5) CTRL+E enter search query at address bar

6) CTRL+R Refresh
7) CTRL+T New Tab
8 ) CTRL+U view source

9) CTRL+O Open Web Page
10) CTRL+H History
11) CTRL+J Download File History
12) CTRL+B Show/Hide Bookmark Toolbar
13) CTRL+N new Google Chrome window
14) CTRL +/- increase decrease Fonts
15) CTRL+P Print
16) ALT+D Select Address bar
17) ALT+leftArrow/RightArrow Go Backword/Forword
18) ALT+` Java Debugger
19) CTRL+TAB or CTRL+PGUP/PGDW switch between Tabs
20) CTRL+SHIFT+N Private Browsing (New incognito window)

21) SHIFT+ECS Chrome Task Manager

Above shortcuts list is still incomplete. If you are aware of any Google Chrome Shortcuts and it’s not included in above list them please post it in below comment.
So start using above Shortcuts to increase productivity with Google Chrome Browser.
Installing Flash Player on Google Chrome without Admin Rights

Everyone hates the administrator. FACT. They block the best sites, and stop you from installing loads of ace stuff on your boring old work computer.
So when I installed the brand new Google Chrome on my work PC (for some reason I can, although loads of other executable files are disallowed) I, a humble internet user, went straight to Youtube to test out loading times etc.
However, Flash needs to be upgraded, and I get a nasty little message telling me I need the latest player.
When I download the file in the link, I get a similarly nasty warning from my PC that I am not allowed to install ‘executables’ like flash player. So no Youtube, no A.viary applications, or anything remotely flash related (seemingly 84% of all online content…)
Here’s how you get round that. Cue evil laugh.
2. Then rename it to .zip. It’s a special archive file of only the plug-in bit of the flash player app from adobe that interacts with your browser.
3. Extract it with Winzip to a place you’ll remember. (I did it to My docs but it can go anywhere.)
4. Grab the flashplayer.xpt and NPSWF32.dll files. Copy them (Right click, copy)
5. Head to C/Documents and settings/”YOUR USER NAME”/Local Settings/Application Data/Google/Chrome/Application/Plugins/ and copy your files in there.
6. Close and restart Chrome
7. Go to Youtube and try it out.
8. I also put the files in this location to cover my bases but I think its unnecessary:
C/Documents and settings/”YOUR USER NAME”/Local Settings/Application Data/Google/Chrome/Application/”File with a load of numbers instead of a title”/Resources/
You’re welcome Internet. After all you’ve done for me.
PS: LOL you got rickrolled10 really cool Google Chrome hacks
Google's Chrome browser is fast becoming the geeks' choice, as users all over the world tinker with it and explore its deeper capabilities. 
Not lacking essential functionality, Chrome is now proving that it can do everything: from starting in Incognito mode by default for better browsing safety to reverting to using a single process for all its tabs to conserve resources. It can even make the images on a web page swirl and dance around like crazy, if you fancy something different.
The range of useful modifications that you can make to get Chrome just how you want it is extremely diverse – made all the more expressive by its blindingly fast V8 JavaScript engine. From simple parameter changes to complex applets, here are 10 handy hacks to whip Chrome into shape.
1. Get more Omnibox suggestions
When you enter a search term into Chrome's Omnibox URL bar, it creates a pull-down list of suggestions for matching sites. However, this is limited to a maximum of five sitesby default, which is a bit restrictive. This hack lets you increase that number.
Right-click on the Chrome icon (even the one on the Windows Start menu) and select 'Properties'. In the resulting window, find the Target text box, add a space at the end of the line and the following text:
-omnibox-popup-count=30
This will extend the dropdown menu to 30 items, but you can change this to suit your needs.
2. Remove just your recent surfing history
The sites you've been visiting will be suggested in the browser's Omnibox. This can pose a problem if you share your PC with other people. If, for instance, you've been looking for a present for someone, it could spoil the surprise. You could clear the browsing data, but this will clear out everyone else's history, too. You could temporarily switch to Incognito mode to ensure that no search data is recorded, but if you forget, you have the same problem.
However, a small, free utility called Google Chrome Backup (GCB) by Pharelia Tools lets you create a backup of your browser's profile and restore it again later, thereby rolling back Chrome's search history to the point at which you backed it up. To use the utility, open its zip file, extract 'gcb.exe' and run the executable.
Using the program to cover your tracks is very simple. Before you begin surfing, press the 'Run Wizard' button. A second window will appear. Ensure that 'Backup' is selected and press 'Next'. Select the default profile and press 'Next' again. Browse for somewhere to place the backup of the default profile (a USB key, for example, on which you could also conveniently store GCB for use on public PCs), and press 'Back up'. The backup takes a second or two, but you'll have to close the window by hand.
After you've finished your confidential browsing session, to roll back the profile (thereby removing just your recent browsing history for this session), run GCB again; press the 'Run Wizard' button, select 'Restore' and press 'Next'. Browse for your saved file and press 'Next' again. Make sure that you're restoring to the default profile, press 'Next' again and finally hit the 'Restore' button. You'll be asked to confirm the procedure, after which the backup will be restored.
3. Use Stumbleupon
Stumbleupon is a great service for generating ideas or simply wasting an hour or two finding cool things. There's no plug-in for Chrome, but that's not a problem.
Right-click on the Bookmark bar and select 'Add page'. Give your new bookmark a suitable name – 'Stumble', for example – and enter the following JavaScript into the URL field:
12 essential Google Chrome browser add-ons

Google Chrome has made a name for itself as a fast, lightweight browser, but has suffered through a lack of support for third-party extensions. Thankfully Google has seen the light, and support for extensions is here.
You need to be running a development version of Chrome – either version 3 or version 4 – which you can switch to by visiting the Development Channel.
As always, back up before you begin, which brings us neatly on to our first recommended extension.
1. Google Chrome Backup
Google Chrome Backup is a small tool that you install and run independently of Google Chrome. It enables you to back up and restore your Chrome user profile settings – a must before you start fiddling about with some of the extensions below.

SAFE DATA: Back up your Chrome settings for security or transferring to another computer
2. Xmarks
Chrome 4 introduces bookmark synchronisation for Chrome, but if you want to share your bookmarks and passwords across multiple browsers, you'll need Xmarks. The Chrome version is still in an early stage of Alpha development, so you'll need an Xmarks account to access it for download. It's still a little flaky, so read more at the wiki before you install it.

KEEP CURRENT: Sync your bookmarks across multiple browsers with Xmarks
3. MyWOT
The web's a dangerous place, so MyWOT is worth its weight in gold. It rates both sites and search engine ratings with a traffic-light system, throwing up a visible warning dialogue box should you try to visit sites that have a poor reputation. Essential if you venture into the darker realms of the net.

STAY SAFE: Vet web sites and search engine results before you visit
4. AdSweep
As the name suggests, AdSweep removes ads from web pages. It can be installed as an extension or – if you're running an earlier version of Chrome – read the instructions on installing the JavaScript version.
5. Chromed Bird – Twitter Extension 0.3
This clever little extension adds a button on to your toolbar giving you easy access to your Twitter account: you can tweet or read recent tweets by your friends, just by clicking the button.

TWEET: Access your Twitter account directly from the Google Chrome toolbar
6. AniWeather
Get your own customised weather forecasts, delivered straight to your status bar with AniWeather. After installing, you'll be whisked away to a web page where you configure the extension to your current location and tastes.

RAIN OR SHINE: Get weather reports and forecasts for your favourite locations
8 Cool Tips & Tricks to Make Most Of Google Chrome
The popularity of any software can be guessed from the number of hacks that trail it after a release. Or the number of add-ons. Google Chrome seems to be not only holding its own but also trotting along. As of April 2009, it is the world’s fourth most popular browser. Not bad for a browser which is few months away from its first birthday.
As user opinions sally back and forth about browser preferences, one thing is not open to question. Firefox is definitely more expandable and customizable than all others out there (Don’t they call it the Swiss Army knife for the web).
But if you like the Chrome’s agility then there are ways to make it more versatile. We at MakeUseOf.com have gone over quite a lot of ground with the Chrome. You can read about some tips and tricks here and here.
Here are some more ways to reach under the hood and exploit some handy Chrome features.
1. Make Chrome’s consume less memory
By default, Chrome is a multi-process browser. Yawn! What’s that? Simply, it means that each tab runs as a separate process asking for separate resources from the computer. The current working tab gets the most priority over the others. This was intentionally designed to make web apps run faster in Chrome. This feature makes the browser zippier and more stable even with multiple open tabs.
But if you aren’t a heavy user and use the browser to surf only a single site at a time then disabling multiple processes can free up some CPU resources. To handle each web process Chrome has three settings –
–process-per-tab
The default mode; each tab gets an independent process of its own. This increases the rendering of webpages and makes the browser stable as each tab is a separate process from the rest. But it also consumes memory.
–process-per-site
One process for each unique website; for instance a user with two tabs open for Gmail and another for MakeUseOf will have the two Google tabs running under the same process.
–single-process
The simplest mode; all tabs run in a single process, much like the other browsers we have now. This setting frees up memory for other applications. This is what we are looking for.
Create a shortcut for Chrome. Open the Properties tab. Edit the Target field as shown in the picture by appending –single-process to the path.

Similarly you can create two more shortcuts for the other two processes to handle your web sessions in three ways.
2. Manage tabs with the Task Manager
This is an offshoot of Google Chrome’s multi-process nature which allows each tab to run separate from the other. This allows us to manage, reload or shut down each tab without affecting the rest of our browsing. All this can be done through the Task Manager. Press Shift and Escape to start the task manager or right click on the blue top bar. An unresponsive tab can be shut down without bringing down the browser by a simple press of the End process button.

3. Some stats for nerds
There is a simple way to tell which browser is using the most resources on your computer. Chrome’s task manager lets you examine the memory use of the opened browsers on your computer irrespective of make. Open task manager and click on the ‘Stats for nerds’ link at the bottom. A new tab opens with detailed memory info for all running browsers. The second part of the page also describes Chrome’s process usage stats.

4. Some more stats on the Resources page
More for site administrators than for you and me but the resources page has a ton of info to offer. To track the resources used by a web page – right click inside the page. Select Inspect element – go to the Resources tab and reload the web page. You can view a list of images, scripts and objects from the web page and you can sort them by size or by loading time.

5. Drag to resize any text box
Do you feel that the size of a text box on any website is not worthy of your thoughts…then just place your mouse on the bottom right edge and drag to increase the size. Give MakeUseOf.com’s comment box the first drag.

6. Split Chrome into double-pane view
This bookmarklet from Chromeplugins.org is incredibly useful. The dual view feature is useful when you want to compare two websites or search results side by side. Drag the Chrome Split Browser bookmarklet into your bookmarks toolbar. When you click the bookmarklet, it asks you to choose the two websites you want and displays them in a double pane.

7. Startup with multiple pages
On launch, Chrome opens up with the ‘Most visited’ area. But it also lets us set options for starting the day by opening our most favored sites in several tabs at once. Click on the wrench icon (Customize and control Chrome) on the top right corner. Under Options – Basic tab we can add the pages we want to open on startup.

8. Drag and drop downloads from Chrome
After finishing a download, you can copy it to the desktop or to any other folder by a simple drag and drop directly from Google Chrome.

Did I miss any of your favorite tips or tricks? Let us know in the comments and lets help each other create a more sleek Chrome experience.
Subscribe to:
Posts (Atom)